
Hello Sewists,
So a few years back, MrA bought me a lovely pair of soft leather gloves. Extra luxe as they also have a fine knitted cashmere lining. Well, over the years, that lining has got shot to pieces and there’s no way I can bring myself to buy a new pair, so, today I turn my hand to darning!

Believe it or not, although I’ve never actually darned anything before, I still somehow have a collection of no less than three darning mushrooms! My favourite of them is this Bakelite one that MrA got for me from a charity shop. Not only is it fantastic looking, but the top unscrews to keep your darning needles in the stem too! Genius. The mushroom is used to maintain the tension of your stitches (as you don’t want to pull them tight or else your repair will pucker up).

As with most projects, I started with a brief google – there’s a lot of information about darning online and there was no way I was going to read it all, but with a quick skim I gathered that it basically boils down to making long vertical stitches, then weaving horizontal stitches back through it (this was a focus-test – one which I guess I’d already failed by not following through fully with the research!).
So I already had the mushroom, and I acquired some lovely big needles (in their own case) on a recent trip to the biannual street brocante in Amiens, France. I just needed some suitable yarn… luckily enough I found myself outside John Lewis one day, popped in and scored a nice Rowan Mohair which I thought would be roughly the right colour, weight and fluffiness. They did have a cashmere that would probably have been better, but it was double the price and I would only need a couple of metres of it. That, added to the fact that I had (as yet) no confidence in my darning skills meant the cheaper option won, hands down! (Jeez, knitting is expensive!)

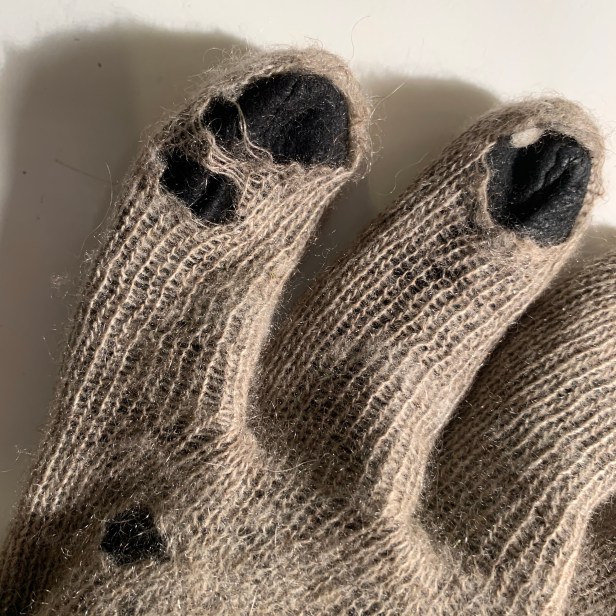
Now, if you haven’t tried this before, I’m afraid I don’t have any pearls of wisdom to share with you. (Perhaps you have some to share with me?). I guess I was lucky that my first attempt at darning was going to end up on the inside of a glove, far away from any potential scrutiny! I started with the small holes on the finger and thumb tips – they were too small for the mushroom, but the end of a sharpie worked well in its place.

Once I’d finished the fingertips (after a fashion!) I just had to tackle the massive hole in the palm. The mushroom fit inside for this which helped – and it was really nice to see it come into its own after having it sit, redundantly, on my sewing shelf these past months.
It was obvious that my wool didn’t match perfectly in colour, but the texture was spot on. The fluffiness helped to mask some of my lumpy stitching too.
To get through it a bit more quickly I used a double thread. I made sure my vertical stitches anchored into ‘good’ fabric at each end.

I started the horizontal stitches with the best intentions of paying strict attention to the weaving element of the task. You know, really focussing on picking up alternate stitches on each pass, being really neat and tidy… Well, after a couple of goes, I tired of this and just went for a general up’n’down, hoping for the best. To be honest, the results from both methods ended up pretty much the same.

If this was going to be a visible repair, say on a jumper, I’m sure it would be really important to keep your stitches neat and even – paying strict attention to the ‘over/under’ element. Although my repair looks a bit like a dogs dinner, it’s doing the job.

So far, it’s fantastically comfortable and means that my favourite gloves can keep on keeping me warm for years more to come. Now I just had to do the really bad one! I started on the smaller holes… getting a little neater I think, but it was the ‘Big-Hole’ that got the special treatment. Before I started, I went around the entire hole with a running stitch. As it had this stringy bit spanning the middle of it, I used this as an anchor for the first row of stitches and bridged the hole with the equivalent of two long stitches in stead of one…


Boy does that look ugly! It was at this point that I questioned if I was truly honouring my gloves by keeping them alive, or in fact, torturing them with Halloween style horror-stitching…!! Still, undeterred, I carried on…

I was doing some of this at work, and while chatting to a colleague she remembered stitching the toes of her and her sisters ballet shoes as a child. This intrigued me as I could remember seeing the girls doing this at Theatre School (all those years ago!) and remember thinking how clever it was at the time. There was also this incredible way that the girls would fix their ballet tights, practically invisibly, that astounded me. If only I’d asked one of them to teach me back then, It would have come in handy now.
Still, with this in mind, I took a new approach to the final hole. I used a single strand of wool to keep it a bit finer, and made a blanket stitch around the hole (I was blanket stitching recently when I made espadrilles). When I got back to the start, I kept going, sewing into the last stitch, in a circle until I got to the centre… Now, I’ve never crocheted, but I imagine this is a bit like it… You can see in the photo below where the bottom of the repair is the linear version and the top part has been done in a circle with looped stitches. (I wonder if this is something like that old ‘ballet-stitch’ the girls used to do…? – funnily enough, I noticed the other day, in the window of a dance shoe shop, that nowadays you can buy ballet shoes pre-darned, with the ribbons already attached… there’s progress for you, I suppose.)

Well, that’s probably enough reminiscing from me. And it’s certainly enough photos of the inside of my old gloves! I’m sure I haven’t re-invented the wheel here, but, for someone usually averse to hand sewing, this has been an enjoyable journey of discovery and reflection for me, as I set out on the first steps of a new skill… and I thank you for coming along for the ride! If you’ve never darned yourself before, hopefully this has shown you that that it’s not impossible… I know mine looks a bit ham-fisted, but it’s done the trick – and I’m sure that the secret to neat darning is nothing more than diligence and accuracy – so go for it!
Above all else, I am so happy to be able to get these gloves back on as I’m usually wearing them from October all the way through to March or April! So, before the insides get tucked away again for (hopefully) a long while, here’s one last shot of my first attempt of darning…

They won’t be winning any beauty contests, but I have to say I’m over the moon with them. They are so comfortable to wear again, warm and soft, just like they used to be. I’m kind-of hoping to find some holes in my jumpers too so that I can have a go at darning them – but let’s not get carried away!

As I said, I’m over the moon!
Happy repairing!
Notes to self;
- Practise the neat version, it’ll come in handy one day.
- I’ve got plenty of wool left should anymore holes appear!
- Maybe I’d like crocheting…?
I love that darning mushroom!! <3 but I raise you a bakalite one that actually lights up ;p lol
seriously though.. great work and even better that you saved a precious gift rather than bin them like most people would.
My only suggestion… pass the remaining wool to your mum and ask her to knit you some lovely new thin gloves instead of socks! Then next time they have a hole or two you can just replace the lining with new thin gloves ;D x
Now that is a fantastic idea 💡👏👍🤩
Your darning looks quite workmanlike to me … the alternative would be to install knitted patches. They are a bit neater, but since you don’t knit, darning is the obvious choice of repair.
It is always worth repairing well-made, much-loved garments. And, as for any perceived messiness on the inside of your gloves: I can’t see it from my house.
Haha, and if you can’t see it, who’s to say it’s even there, right?! 👍🙏
Hmm, maybe I could knit patches…? That’s something to think about for next time, thank you 👏🙏
PS your darning mushroom is divine and I feel most jealous of it.
It’s a beauty isn’t it! 👍🙏😀
Oh how I laughed when you described your weaving as I’m like this and I’ve been darning for years! What a journey you’ve been on with these gloves and what a fantastic result. I love that they’ve lived to see another few winters, especially as they were a gift. Great post Andrew! BTW Tom of Holland does darning classes and if he’s ever doing one in London (he lives in the UK), you should enrol.
Haha, that’s funny! I had no idea how I was doing as I had nothing to compare it to!
I’m so glad to have them back on as it’s turning really cold here now!
Thanks for the tip, I’ll look out for a workshop, I think I’d love that 👍🙏
Lovely mending and thank you for sharing this post. I learned quite a bit from this and I have a small request. Would you mind giving an update after you’ve worn your mended gloves for a while? I’m curious to see how the looped stitch wears compared to the horizontal & vertical stitch. Thx again.
Hi, thank you. Yes, give me a nudge in the spring and I’ll let you know how they’ve fared 👍🤞🙏
Well done. It’s sad that so much is thrown away when with a little effort much can be mended and last longer. You will enjoy warm hands even more this winter knowing what is inside your gloves.
Thank you, it’s great to have them back on 👍🙏
Awesome effort. Shared to my visible mending group Rafoo at https://www.facebook.com/groups/rafoogari/
I’m not on Facebook, but thank you, it sounds cool 👍🙏