
Hello Sewists,
I never thought I’d be saying this, but here I am having made a pair of shoes! As much as I’d like to tell you I’ve hand-cobbled a lovely pair of ‘Double Monks’ … well, I haven’t, but I’m equally as excited to tell you I’ve made… espadrilles! At last my dreams of a 100% me-made outfit can be realised by this humble, yet landmark Holiday Shoe! Personally (at the ‘ripe old’ age of 46) I haven’t worn espadrilles since Wham! but I’m totally willing to go there for the amazing feeling of being clad head to toe in things-made-by-me. (By the way, I haven’t actually made a belt… but for just this one day, I didn’t wear one!)

I’ll be honest, I’d put off making them for a while as I was apprehensive about the hand sewing – not only would I need new and unimagined kit, it would take ages and probably hurt my fingers too… At least that’s what I thought. In reality though, it’s oddly obsessive and I’ve ended up making six pairs to date. I know, right, six pairs! (Mr.A and I have two pairs each and two pairs were gifts… although I’m not ruling out making a few more!)
I’ll tell you what finally got me going with them, I have a friend who’s ‘just’ a bit obsessed with espadrilles. One day I got a good look around her collection and must admit there are some pretty exotic ones; leather, braided, studded, backless, straps… the options are endless. Don’t worry, if you don’t have an obsessive friends’ collection to ogle, there’s plenty of inspiration online. So with my resolve restored and my soles ordered, it was time to pick some fabrics…
The fabric…
Fabric wise you could pick almost anything – I chose sturdier fabrics like denim and quilting cotton. I interfaced some of the lighter cottons for more structure but soft fabrics work well too, a linen or some ticking would make a great slouchy pair.
If you’re cutting down a pair of jeans into shorts this summer, keep the legs and use them to make your espadrilles.

Then there’s the pimping! You can pimp them up however you like. I found some fun patches on a market stall in Covent Garden and zigzagged those on to a few pairs…

… you could hand embroider, appliqué, colour-block, weave…. blimey, anything!
Tracing & cutting out…
… was pretty easy. The templates come with the soles you just need to add a seam allowance and trace or cut them out. You might as well cut it because if you buy more soles, you’ll get a new pattern with it anyway. The heel parts are the same for left and right, so you can’t really mix them up. But the toe parts have an inside and outside so make sure you mark this on the fabric before you clear away the paper pattern. I made a chalk ‘X’ on the wrong-side of the inside pieces and snipped a little notch too.

Machine sewing the uppers…
This is the easiest bit! So easy in fact that MrA sewed his own – I was so proud of him: he often expresses an interest in some craft or other, and it usually ends up with me making it all while he watches Antiques Roadshow… Not this time, no, not-on-today! He sewed the uppers completely by himself, clipped the seams and turned them through. He’s pretty good with an iron as well. The most important thing is to leave a gap for turning – forget this at your peril! By the time he was getting his second pair however, the shine had somehow worn off and I had to assemble these for him.

The instructions say to leave the gap on the heel pieces at the centre-bottom-back seam. On the next pair I left one of the short ends open, as these ends are totally covered by the top piece and I can machine stitch it closed. On subsequent pairs I left the centre tip back seam open for turning and topstitched it closed.
For the top piece, it suggests leaving somewhere along the curve open; This was a bit tricky to press after it had been turned through, so on later pairs I left a section of the straight edge open, and top stitched that closed after turning too. Like these ones…

Attaching the uppers to the soles…
I’ll admit that I lost some good pins to this section of the job. It’s probably not necessary to use as many pins as I did, in fact; by the time I hand-sewed them I’d taken 2/3 of the pins out again. But for a few weeks, this is how the first pair sat.

They not only waited for the thread to arrive (it took much longer to choose than to arrive!) I also needed a combination of the ideal space/ time/ mood to do it. That came on a 6 hour train journey to Cornwall; MrA & I had a whistle stop trip for his mums birthday and I took my blanket stitching with me… I’ve had a few long train journeys lately and stitching a pair of espadrilles together has proved to be a very satisfying task to kill the time.

Blanket stitch.
I’d been feeling daunted by this, which I shouldn’t have. It was really rather enjoyable. If you haven’t blanket-stitched before, it doesn’t take too long to get the hang of it. In all the pairs I made though, I didn’t get a photo of this first step! So these are from when I re threaded halfway through (which is just the same as starting from the beginning…)

Start with a length of twine – I tried the prym espadrille thread, which was good, but difficult to find in the right colours. Then I bought a ball of 1mm twine from the internet which was perfect (& will last me forever!).
Tie a knot in one end and start where the front & back sections meet in the inside of the instep. Insert your needle from behind the upper layer so that the knot is in between both front & back layers… you’ll be glad you did once you have them on.

I make a couple of marks on my thumb to help regulate the stitch width. Holding the thread under my thumb, I put the needle in halfway down the sole, coming out of the upper about 5mm from the edge.

Pull the thread through to create the loop…

Then keep going all the way around! You’ll have enough to get about halfway, and when you need to change thread: sew back on your last stitch (from the upper into the sole) stitch a small knot, then pass the needle through the sole to bury the thread tails. At the end, tie the last threads together to complete the chain.

Closing The Sides
I wanted to put rivets on the denim ones, but MrA said they would rub, and he’s absolutely right. Even a small knot on the inside will drive you insane. So I suggest using the twine you sewed them up with and making a simple, one-thread bartack that you knot in between the front and back uppers. Here, like this…

And then you’re done!
Espadrille Gallery!


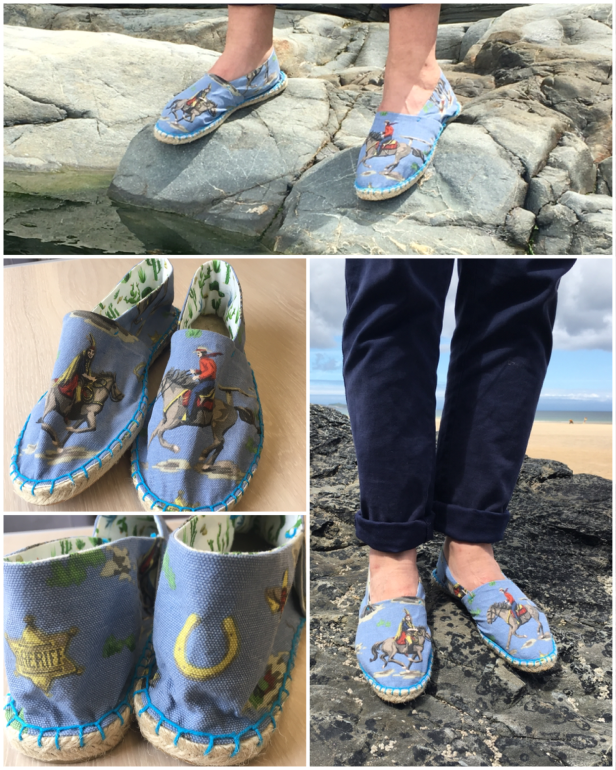


There’s a beautiful path along the coast at my mother in law’s house and it’s always a lovely walk. This time there was an added excitement as we all stepped out in our hand made espadrilles together. They’re an easy thing to make as a surprise gift because all you need to know is the recipients shoe size. And we all agreed that they really are comfortable to wear – across many varied terrains! The ideal summer shoe… now I completely understand why my friend is so obsessed with them.
Happy Sewing!
Notes to self:
- Don’t take more than 1m of twine at a time, it’ll tangle like crazy.
- Remember to mark your thumb for a stitch guide.
- Maybe take three pairs for the next 6 hour train ride!
Meeting you and Mr.A was a highlight of MPB day. Adore the espadrilles and look forward to trying out a pair for me!
It was great to meet you too 👍🙏👏 have I got you on Instagram…?
These are brilliant. Where do you buy the kits from?
Hi, thanks. I get the soles from amazon – it looks like prym & dritz make them 👍
This is the way to make unique, personal footwear.
Thank you 👍🙏😃
These are brilliant! Love them
Thank you! 👍🙏
Espadrilles seem like the quintessential summer shoe – thanks for the inspiration Andrew!
I’m loving them – hardly taken them off! You should make some, you won’t regret it!
Right, you’ve well and truly inspired me to sew up the espadrilles that I’ve had sitting there for at least three years. I fancy leather though. What do you think? I have some bought leather ones that I love, so I think the concept works. This might be a perfect activity for my next trip – make on the plane and wear when I get there! I love every single pair of yours, and now I’m off to google the twine!
Yes, leather would work really well – my friend has all sorts of leather and suede pairs. For the twine, I searched amazon for ‘1mm twine’ – I think I ended up with bakers twine, but it works really well! – If it’s a long trip, take a couple of pairs, they come together surprisingly quick once you get going!
Oh Andrew, these are dreamy! I am still wearing my fave espadrilles 30 years later! They have a long ribbon that goes up your leg. I love them so this is definitely going to be on my to do list!
I was thinking about your stud idea. Can you stud the outer piece only so that the inner piece works as a pad? Or even put a little interfacing on the inner lining piece for extra padding?
I say yassss to studs!
Thanks! Now I’m off to oogle your suit post! I love to sew for my son!
Jodie (@mystashislegal)
Hi, thanks Jodie 👍
I have to admit, I’m pretty taken by them! … I’ll find a way to get the studs on, even if it means shredding my feet 🤣😂😅👍🙏👏
Wow! After seeing these I absolutely must make a pair. Do your soles have rubber on the underside?
Yes they do 👍
Squeeeeee! These are fantastic. I’m filing this post under “future projects” for sure.
Hey! Thank you! Make them, you won’t regret it – the moment you put them on!
These look really great and super for summer, do you add any card stiffener to the backs to stop them collapsing or is firmer material ok. You will have to go into production another string to the bow!!
Hi, thanks. Hmm, card would be great, or a really stiff interfacing. I’ve just been letting them slouch when they do… I saw some with elastic in the back seam, but I thought that might rub…?
The handsewing bit really is addictive! I might need therapy!
This is just fabulous. I love all paires of them. Great post Andrew!
Thanks Wis, they’re so comfortable! Perfect for a summer stroll!