
Hello Sewists,
Long time; no blog – my apologies!
In my absence from here I have been on Instagram (@sewandrew – if you want to follow me there) and, as well as being busy in the salon, I’ve also been making some sewing videos (there’s a new one on YouTube and a couple more coming up that I will be able to tell you about very soon…!)

But it’s this boiler suit that has lured me back to the blog; as I said, I’ve been delving further into video making recently – and after being quite busy and hitting a couple of deadlines, I decided to make this boiler suit with the cameras off, just for fun, no pressure..! I had this lovely sky blue cotton suiting tucked away for exactly this purpose, pre-washed & ready to sew, there was nothing stopping me.
The only hitch came very early on with this project. Before I get into the pockets, I’ll explain what happened in the hope that I can save someone else from having to go through the same panic I did…
To get a better fit on this pattern I’ve previously morphed the top with my favourite shirt pattern. This means that I can use the sleeves and cuffs from the shirt pattern when I make the boiler suit… I’ve been lazy and rather than trace replica pieces to keep with each pattern, I take the ‘shortcut’ of rummaging around for the pieces I need, when I need them… invariably they are in the opposite envelope to the one I want them to be in!
So, having thought about this new boiler suit for a number of months, when the opportunity presented itself, I leapt straight to it: In record timing I pinned and cut out all the pieces from the envelope. I’d made a pair of shorts from this fabric – and so was thrilled to have cut out all the pieces and see that I had such a small amount of fabric left. (What’s that about pride coming before a fall..?) It wasn’t until I was cutting out interfacing that I thought to myself… ‘ooh… cuffs…?’ And a split-second later… ‘Aargh…! Sleeves!!’ … I hadn’t cut any out, none! My eye went immediately to the small pile of scraps on the corner of the table. The same ones I had been so proud of just moments before… Life truly is a rollercoaster.
The next half an hour was spent online trying to find another metre of fabric. The cruel reality is that it was quite easy to find out that there was absolutely no more of this fabric available! … unable to settle on my next move, I went to bed*. (*This is my Mothers’ cure-all, her panacea… ‘going to bed’ will (apparently) solve everything from a bad mood to a broken limb… )
That night, rather than sleeping, I hatched a plan to make the boiler suit a short sleeved version, maybe that would solve my fabric shortage dilemma? – the question that needed to be answered was: just how many patches would I need to make enough fabric…? It was still relatively early in the evening; I could have just got up and checked my scraps, but the masochist in me had decided to sweat it out … and by the morning I had my answer…
… Thankfully, there was one piece of fabric left that, if I folded it sideways I could just cut out two whole short sleeves, without any patching or piecing. I’m sorry to admit that after a restless night, I was equally pleased and disappointed – part of me was looking forward to seeing the interesting seams that piecing would have created – but, actually if I’m honest I was probably more relieved (… although I’ll never get that night’s sleep back!)
The moral of the story: just because the pieces can mix and match between patterns; it doesn’t mean they should! The lesson: trace separate pieces for each pattern envelope.
So back to the sewing and the plan with this one was to go all out with the pockets. The main pockets are nice big slash pockets, on each hip. I really like the size and position of these so I left them as they come (I’ve previously drafted-out the extra opening behind the pockets). These pockets are deep enough to still have space for your hands even when they’re full of stuff!

With the top pockets, my glasses often fall out of the usual patch pocket when I bend over to pick things up. So on the front-top-right I pulled out all the stops; attaching a gusset and flap to make a safari pocket – These are my dream pockets, I love them! I haven’t decided yet whether to fit snaps or Velcro, so the flap is still flapping for now but it still keeps my glasses safe. I couldn’t be happier.

It wasn’t too tricky to upgrade the patch pocket to 3D. I’m still deciding where I like the stitching/ preferred shape etc so I’ll go into more detail on that another time (Let me know if you’re interested… maybe a blog, maybe a video…?) The other chest pocket got a totally contrasting makeover with double welts, a zip and visible topstitching. This is a nice secure pocket to keep things safe in, a credit card or bit of ‘emergency’ cash.

If I’m honest, there’s a bit more stitching showing here than I would have liked, but I needed a wider zip tape than I had and wasn’t willing to stop..! It may look a bit scrappy now, under the microscope but these things usually stop bothering me after a wash or two – I’m sure that over its lifetime the stitching will bother me a lot less than unpicking it now and re-stitching it would!
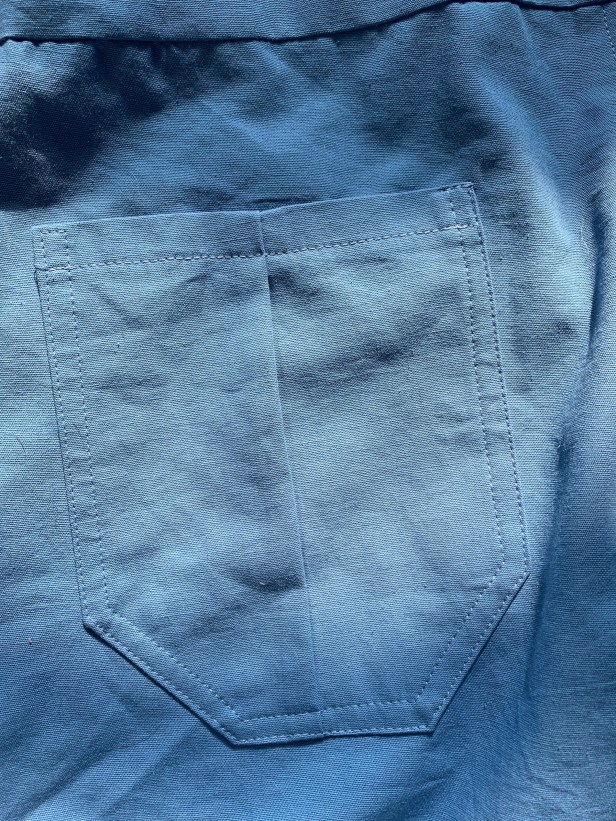
At the back I cut the pockets slightly wider and added a small pleat to the centre. Nowadays I’ve usually got dog poop bags in my back right pocket and treats in the left. These will accommodate them well.
And finally… my favourite pocket of all, I added a fifth one on my right thigh, like cargo pants. It’s another 3D patch pocket with a flap, slightly bigger than the others. This one is great for work, I can keep hairbrushes in it while I’m blow drying my clients in the salon, and it’s really handy if I forget to take a bag out to buy lunch – big enough for a sandwich and a bottle of water!

As i’m sure you’re aware, this isn’t the first boiler suit i’ve made – the trickiest part for me (always) is fitting the waist elastic. The pattern doesn’t call for it, but I like the way it adds a bit of shape. I usually anchor it at one end, make a casing and feed it through (with great difficulty) before anchoring it at the other end… This time round I decided to try a new method: I chose an elastic slightly wider than my finished waistband (I know, right… eh…?) and omitted the waistband facing altogether…! I tucked it into the front facings, and stretched and pinned it all the way along the inside of the waistband. I sewed it down from the right side, as the waistband topstitching, but the added bonus was that I was catching the edge of the elastic underneath.

I managed to miss most of the elastic on my first go around, so had to unpick the whole thing, re pin it (more carefully this time) and sew it again. Thankfully, second time, it worked. The benefit of this is that it is a lot less bulky than my previous casing method. The pinning was tricky, but not as frustrating as feeding the elastic through and anchoring it evenly. The only downside I can think of is that the elastic is ‘raw’ on the inside… this would only be a problem (maybe) if it was directly against my skin… at the very least I will have underwear and a t-shirt under this, so I don’t think that will be a problem.

The big differences I made to this one from the last are:
- Obviously, the pockets.
- New waistband method.
- I extended the bottom hem by 5cm to allow for future shrinkage.
- Extended top of trouser pieces 1.5cm (for same reason as above)
- Extended bottom of ‘shirt’ pieces by 1.5cm too
And after a busy few days, I managed to finish it just in time to wear to work at the salon! The first time I made this pattern I added back elastic, but it was pretty much ‘straight from the envelope’ for my cousin. For my first one I added the full waist elastic. Then I modified the top for narrower sleeves and tapered the trousers a bit, now I’ve bespoke-d the pockets and streamlined the waistband… this pattern just keeps on giving! I’m keen to see what modifications I make on the next one!


Happy sewing,
Andrew
Notes to self:
- Trace separate pattern pieces for each pattern.
- As there’s always a bit of shrinkage, cut a few extra cm’s, or maybe pre-wash more than once?
P.S.
I just realised, I don’t think I ever posted my Executive Boilersuit on here. It went on Instagram but I never got around to blogging it – basically I made it the same way as the green one – so just in case you’re not on insta, here’s a photo.

It’s a lightweight Prince of Wales checked suiting. I haven’t had anywhere smart to wear it yet, but it’s been worn a lot, trust me! I particularly like wearing the boiler suits with a smart shirt underneath, in the winter I’m thinking of moving on to polo necks: I’ll need to find a pattern, or hopefully it won’t be to tricky to modify my usual sweater pattern…? We’ll see!
Hopefully it won’t be so long until next time. In the meantime (… if you don’t already…) please consider following me on Instagram or YouTube for (possibly) more regular updates.
Happy sewing!
This boilersuit came out nicely! And I like the short sleeves in this fabric. Sleeves will always do us in! You get so excited that you manage to use nearly all of the fabric with little to no scraps left, only to notice you haven’t cut out the sleeves yet. You are a pocket genius btw!
Thanks Abbey 🙏 yes, pride definitely comes before a fall 😅 but I’m really happy with the short sleeves 👍 It was like making a pocket-sampler! I might do another one with even more!
I think this looks great and personally like the short sleeves, great colour fabric as well. You are getting quite a production line of these now for your work. Must have a look at the youtube some time .Regards.
Thanks Bill. Yes I think this is my fifth one now!
Totally loving the short sleeved version! I’d be filing that one under “Happy Accidents”.
Absolutely! 👏😅
Great to hear from you again Andrew – your boiler suit is very impressive…
Sue
Thank you Sue 🙏
Kudos Anrew… You are the pocket king!
Or “Andrew”… (oops…)
🙏👍
Haha thank you 🙏😆