
Hello Sewists,
I hope you’re all doing well? I’m back with another pattern from Patrons les BG, this time the rather aptly named ‘Cheeky’ chinos.
I should tell you straight off the bat, that while all the ideas and opinions in this blog are my own, I did receive the pattern for free from Olivier & David at Les BG. They asked for nothing in return, not even a review, but I’m writing one anyway! If you want to hear a bit more about the guys, check out my last post, or the Patrons les BG website and both Olivier & David on Instagram.
The Pattern
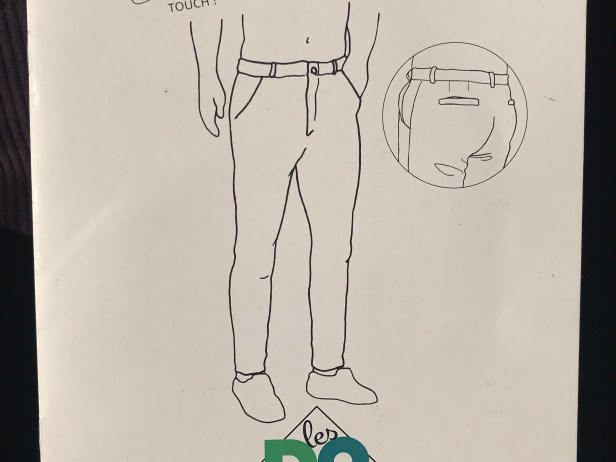
These trousers have slashed side pockets and two single welt back pockets. There are four (count ’em… four!) shaping darts at the back and a curved waistband. The sizes range from S (84cm waist) to XXL (110cm waist) and the packaging is the same as the ‘Bold’ pack – a nice sturdy plastic envelope with a fully illustrated A5 instruction booklet and the front card image. If you fold everything well, there’s just enough space to fit your traced pattern in when you’ve finished – but don’t forget to add seam allowances.
Now, I wanted to make the full length chinos, but when I bought this fabric (a good sturdy cotton drill from Goldbrick Fabrics on Goldhawk Road) I had a mental block and bought only a metre instead of one and a half. So it’s shorts instead. Good job really as london has been hotting-up (sporadically) recently, and I’ve got my USA trip where I know it’ll be hot. I cut these off just below the ‘lengthen/shorten’ line on the pattern and with a double 1″ turn-up they’re the perfect length for me!
The Instructions
I’ll be honest (… otherwise what’s the point, right?) I didn’t find the instructions to be the clearest. For instance, if you haven’t made welt pockets before, don’t expect your hand to be held here – The information is there for you, but there’s an element of the ‘hey presto – it’s done’ about it which did leave me guessing at points. And I didn’t really trust the instructions for the fly, although I’m sure it would work, it required a bit too much faith for me so I stuck with my usual method.
Another mild gripe is how close those darts are to the back pockets – on other trousers the darts have been sewn first and the pocket after. It’s the other way around with these ones. I realised I’d made a mistake when I sewed the stitching around the sides and top of the welt before stitching the darts (I didn’t notice that the instructions say to stitch it after) it ended up distorting the top line of my welts – and I was really proud if these ones too!

I unpicked the stitching and tried again, I think it’s a little better…

… but to be honest, that stuff only really matters when you want to take close-up photos of them and post them online… in reality, everyone (kindly) says they look marvellous and I’m wearing them on constant rotation as I feel fantastic in them! So it can’t be all bad can it?!

The Fit
They turned out a little on the snug side, but I guess that’s where the ‘cheeky’ element comes in. In truth, I could probably just loosen the double darts at the back by a few millimetres, but after wearing them for half an hour they eased up and are really comfortable.
The waist is quite low, which makes a change from many of the dated patterns that are still doing the rounds. And the shaping around the waist and seat make them really comfortable to wear (on my shape at least…) you can see that they look pretty cheeky all by themselves…!

Personalisation
I finished the outer leg seams separately with rainbow thread on my overlocker, so that I could press them open and have it showing on the turn-up.

And I took a new approach to attaching the tops of the belt loops too: I always have trouble stitching evenly through the bulky tops of the beltloops – even with a wedge of fabric behind the sewing foot to keep it even. This time, I set the machine to zigzag, width 5mm, 0mm length and made a cross on each of the loops to hold them in place. This was much easier to control, and I think looks pretty cool…

I used some of the leftovers from my cactus-cowboy shirt for the pocket linings and waistband facing. So even though they seem like innocent grey shorts from the outside, there’s a whole load of personality going on behind the scenes (… seams…?!)

Conclusion
Overall, I’m really happy with them. I’m looking forward to making a full length pair in the not too distant future. And I’m getting plenty of wear out of these.
I’ll be on my way to America around the time I post this: MrA & I have a wonderful sister in law and two amazing nephews in Vermont and we’ll be seeing a little bit of Canada with them. On the way back we’re stopping in NY for a couple of days and it just-so-happens to be Peter Lappin’s Summer MPB Day! It’s an honest coincidence… honest! I can’t wait to join in with that – I’m sure I’ll tell you all about it!
In the meantime,
Happy sewing!
Notes to self:
- Tweak the darts or let out the back seam a little on the next pair.
- Remember to baste first and try things on as you go along – saves a lot of holding your tummy in later!
- Andrew, you need at least 1.5m of fabric for trousers, and you know it, you fool.
This is great! Was hoping to use this pattern for shorts too. Thanks!!
Thank you 🙏🏻
I adore these trousers and must investigate the pattern. Enjoy your trip, I’m hot on your heels. PS you might get two comments as my first one didn’t appear.
Thanks Sue! What a shame you’re not around for MPB day! Looks like you’re really covering the globe this year! X
I adore your shorts and must go and investigate this pattern. Thank you for all the tips. Enjoy your trip, I’m hot on your heels!
I love the idea of using your cross technique to secure the belt loops. My machine would certainly do those easier than a bar tack and they do look cool!
Thank you, it seems to have worked really well – very secure 👍
These do look good and after such neat welt pockets shame that darts were added but perhaps a case of doing things you know works rather than pattern instructions. I might be wrong but are they lower fit from crotch to waist as well in the design. The hoodie looks good with those shorts as well,
Thank you, yes, they are quite low rise. I’ll make the darts shallower next time.
I posted the hoodie by mistake!
These look very low waist and tight fitting, looks like you could use a nice fabric with mucho stretch. I personally don’t use many woven only fabrics anymore and go for fabrics with good amount of stretch for comfort. I have been also using fabrics that are breathable, moisture wicking and easy to wash. Which is super important when you have to live out of a suit case as I did in the past. I really liked the hoddie you made to match your shorts. Such a cool look.
Thank you. Haha, yes, I posted the hoodie by mistake! Will repost next week with some better photos hopefully 👍🙏😃