Hello again. I am pleased to announce I have finished my first ever jacket. You can read about day 1 below where I traced, cut, seamed, darted & had a stab at the double welt & flap pocket (the results weren’t all that pretty, but a new process was learnt. I’m very much looking forward to doing them again with thinner fabric and a working steam iron).
Day 2 starts with sleeves. They went together easy enough.
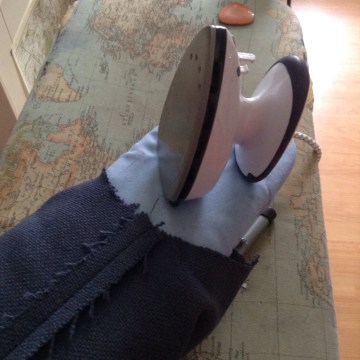
As well as my sleeve press I also managed to root out my mini steam iron. #sewingessentials.

It was the gathering stitches and easing into the shoulders that I wasn’t looking forward to. I’d tried it once on a very early attempt at a shirt. I didn’t like it. It looked like a Snow White costume! Every other shirt I’ve made has the sleeves put in at the shoulders first, then sewn up with the sides. Much easier.
I actually enjoyed it though! Probably because of the ridiculously spongey fabric I’d mis-chosen, it all eased in rather nicely, I thought…

Heartened as I was, the cotton lining attempt that followed ended up more Snow White again. There aren’t any pictures of that!
The hems were easier than I thought too. I don’t mean to sound smug, but I was dreading it all lining up. I added some binding where the pattern suggested overcasting. I will bind the main body seams in the next version too as the half lining doesn’t cover them. The bottom hem went up with the blind hem stitch & foot on my machine.
Now, I’m not a massive fan of hand stitching. It’s ok if it’s a few neat stitches somewhere visible giving a hand finished look. Anything more than that and I start to get really scrappy looking. As a rule, if it’s not going to be seen, I’ll try to find a way to machine stitch it! I remembered reading online somewhere a method for attaching linings at cuffs by machine. There was no chance I’d find the piece again, so I tried to work it out.
I put the jacket on (leaving a trail behind me in case I got lost in it!) so that the linings were smooth. Took it off carefully, folded the lining inside to the outer & pinned it. The next bit was tricky, I turned both sleeve & lining inside out and re-jigged the pins so the edges matched & I had enough turn-back to sew on. It worked. By the time I’d worked it out I could probably have hand sewn them!
Once finished (no buttons, not much final press- still using the mini-prym iron!) I took it round to my cousin as he’s a bit taller than me and about a size bigger. It was still massive on him, but at least I could see that it was a jacket.
I’m going to keep it as a reference for the next one. I’ll cut out a small, then, I’ll have a go at fitting it to me. I’ve thoroughly enjoyed this practise run, but the next one has to fit me!
- Take more care choosing fabrics.
- Finish seams as I go.
- Read instructions until understood.
- Research before, not after! (I am now reading the a david Coffin book on tailoring).
- Don’t just make… Fit.
- A big task is only small tasks grouped together.
I’ll be less afraid to try new patterns in the future. Thanks for reading.
Until next time …


I followed your example and created a WordPress site – pledase take a look – https://amateurtailoring.wordpress.com/
Welcome to the world of blogging! That’s a great looking jacket. I’ll really look forward to reading about your makes. Thank you for the mention, it’s a great outlet writing the blog, even more exciting when people read & enjoy it!
Thanks for this report. I just finished a jacket using the same pattern but used a cotton corduroy, which pressed flat really well. I’m very pleased with the end product, though it is rather baggy. I’m 44″ chest, for which “Large” should be spot on, but the jacket is very roomy from armpit to armpit across the back. I could wear a medium-weight jumper underneath. It would appear that Kwik-Sew’s stated sizes are very conservative compared to their actual sizes.
Hi, yes, pretty roomy! I made it again (http://wp.me/p6jnHT-11) a size smaller out of twill & I love it! I tried another KwikSew which turned out too big… (And burda comes small…🤔 ) I’m trying to remember to pin new patterns together and at least hold them up to me before cutting the fabric now! I’m looking forward to making another one soon.
That’s what they call “draping”. It’s used a lot in the fashion industry, often on a live model/client but also on a tailor’s dummy (my next big investment). With care you can drape the tissue pattern or, more commonly, inexpensive muslin. There are some really good draping videos on YouTube.
Love your MkII version. One small observation – with a striped fabric, pocket welts generally look better with the stripe running along the length of the welt, though you did an excellent job of getting the alignment right.
Will be wearing my jacket for the first time tomorrow at cousin’s’ wedding anniversary celebration. It’s terracotta and dark brown cord from myfabrics.co.uk (which is actually a German company).
I’ll post a link to some photos when I’ve decided where to publish them.
Great, I’ll look forward to seeing it. Enjoy showing it off at the party!
I’ve used myfabrics too, small world!
Thanks for the tip on the striped welts, I realised after I’d have been better off using the fabric sideways… But if I keep my hands in my pockets…. ! I like the idea of using a different fabric for them too… Maybe one day…