
Hi Sewists
It feels like I’ve been working on this coat forever! The fabric arrived a couple of months ago from Minerva Crafts – to review as part of their blog (click HERE to go to my review on the Minerva site). I knew how I wanted to make it, but it took a while to collate all the necessary bits and bobs – also there was a Christmas in the way!
I’m using Burda 7142 and I wanted it to look pretty much like the packet picture, but to feel like a nice warm duvet once it was on. With this in mind, I bought some medium loft fusible wadding and used it to interface all the main outer pieces (fronts, back, sleeves) and I used a medium weight iron on for the facings and collar pieces. This made quite a big pile of coat…!
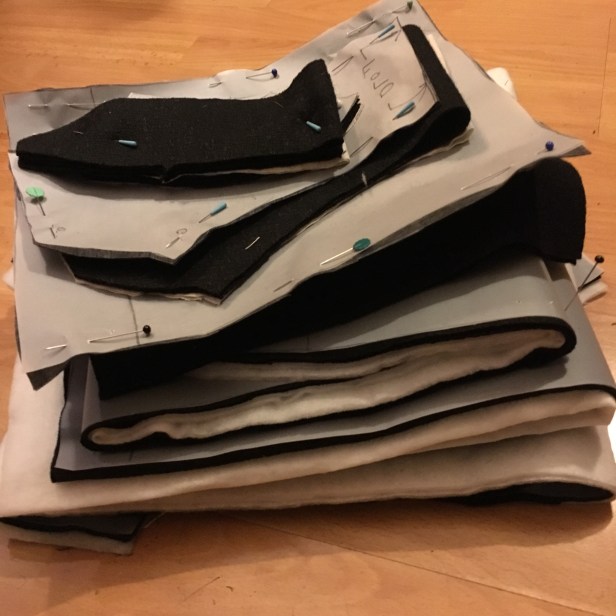
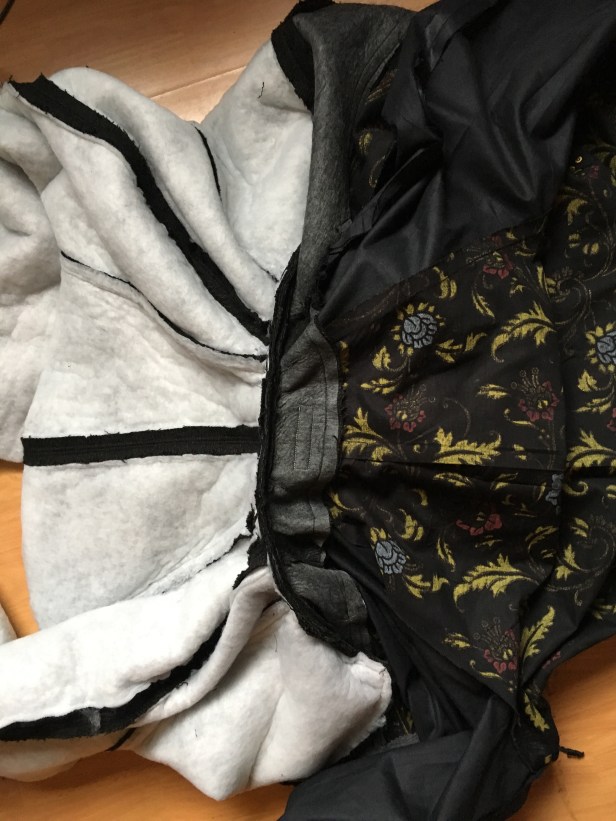
… and it took a while to iron on! But I took my time and did each piece carefully (and lightly!) with a cotton pressing cloth for protection, and it went by without a hitch. The outer came together well too: I used the walking foot as it was all very spongey, and I stitched the seam allowances down as I went. I’d considered switching the patch-pockets for welts or in-seam-pockets, but decided against it. What I really wanted was deep, warm pockets to plunge my hands into – so I kept the patch design and lined them with a short-pile faux fur backed jersey (that I’d also got from Minerva and made THESE TOPS out of). I did make a few changes though: Namely the lining, the pattern only comes with a half lining and I wanted my coat fully lined. (I had this piece of fabric from oxfam – for £1.99! – which seemed perfect for the project). To create the lining I cut out an exact copy of the outer pieces. Then, I overlaid the facings and marked the difference. To maintain a bit more length, I only cut 3cm from the hem & cuffs. After adding seam allowance I could cut out my lining.

I doubted myself that I’d done this properly and so it sat in a box for a while. The outer shell all sewn-up, taunting me from the mannequin in the corner…

Eventually I plucked up the courage to tackle it and it all came together smoothly. I’d left the instructions behind long ago and so it made sense to sew the lining together like this: 1st sew the sleeve seams. 2nd sew the facings. 3rd sew the arm & shoulder seams. Then I added an inside welt pocket – I made it all out of one piece, similar to the way I did on my Camil Cardigan.


With the two shells made up it was time to sew them together. Pinned carefully all the way up the front, around the neck and down the other side. This was pretty bulky going over the shoulder and sleeve seams, not to mention over the collar, but it was spongey thickness rather than dense thickness so a universal 80 needle and the walking foot saw me through.
For one last twist I decided to add side zips to the hem. MrA has these on a very nice old coat that he’s had for years. I’ve always admired these ‘Striding-Zips’ (as we’ve come to call them!) and set to getting myself some. It was simple enough to line the zips up and stitch them to the side seams. I even managed to sew most of the lining down from the inside too, but had to finish the inside of the lining off by hand. Just a few stitches. The zips were salvaged a year or so ago from a much loved jacket that had totally fallen apart on me through years of wear. I’ve only got gold toothed metal zips in my stash, so these pewter ones are perfect – there’s enough bling on the inside!

Bagging the sleeves wasn’t the nightmare I anticipated it to be in the end. It seems that I have actually accumulated a little bit of experience after all, and the whole process seemed to have light shone all over it!
- Lay your coat down, inside out, after sewing the outer & lining together. check there are no twists.

- Roll up the cuff of the lining up a good 10cm or so.

- Lift up the outer cuff and feed the lining inside. Match it at the seams first and pin all the way around.

- Wrestle it under the sewing machine and sew the outer and lining together.

- Unpick the stitching inside one of the sleeve linings to turn the whole thing the right way round again.

Then it’s just the ‘simple’ matter of buttonholes… hmm.
I’d thought long and hard about this; having originally considered (& discounted for being too bulky) bound button holes. I thought I’d make a concerted attempt at hand sewn buttonholes (… only to be put off by the one friend who’s ‘sewing-opinion’ I value most! – now, there’s a vote of confidence 🤥). I’m convinced it’s too bulky to get through my machine, although there’s only one way of finding out… so I vowed to make a mock up and trial a few… that hasn’t happened yet, and in the meantime, I’m wearing my coat anyway!


And the striding-zips doubled up nicely as cycling-zips!

It’s lovely and warm and I really like the shape. I thought it looked a bit cocoon-like on the pattern, and wondered if the wadding would emphasise that, but it has a good movement to it. I’ve seen a few of these popping up on Instagram and they all look fantastic. There are some amazing colour combinations… this pattern is crying out for a colour-block-hack! Mine’s pretty dull in comparison, being plain black, but I think the lining comes some way to making up for that – and the texture on the wool makes it look a bit more special too.
Happy sewing!

Notes to self:
- Hopefully the dry cleaners can remove the excess dye.
- Hopefully it’ll still be black after that!
- It’s a game of strength and will to see who and how the buttonholes will get done first!
Spectacular! That lining and the zippers are mind blowing.
Thank you so much! I still haven’t taken it off long enough to get the buttonholes done!!
This is gorgeous and well-done.
Since you actually HAVE the luxury of a buttonhole service, do that. Really. I envy that service a lot.
Thank you! I still haven’t had time to go, but I will! 🙏
Wow this coat is amazing! It looks simple and elegant and hides an amazing lining inside .. congrats
Thank you 🙏 I still haven’t taken it off long enough to think about buttonholes 😅
It turned out great Andrew!! I think professional buttonholes are definitely safest, heh, but it’s a shame you were put off trying them. I watched a few videos you had mentioned when I got home and it looked quite interesting! I guess it probably takes a bit of practice though…
One day I’ll sit down and practice them, I’m sure… one day… until then, I think it’s DM Buttons for me! 👍🙏🤞😄
Wow, just wow. It looks amazing!
You should totally treat yourself to professional buttonholes, it deserves no less.
Thank you! I think I will! 🙏
This is just a fabulous coat. I made my husband one of these from boiled wool, but I think yours is more gorgeous!
Thank you! I’d love some boiled wool myself! In a nice forest green 👍 this is so cosy though, the wadding makes it really warm too!
Oh gosh, I’d be tempted to wear it inside out, it’s so fancy on both sides!
Haha thanks! All the while it has no buttonholes it keeps flapping open anyway! 😂
The lining really makes the coat. I have yet to try bagging a lining into a jacket, I’m still doing it the old fashion way. I think I need someone to actually show me how to do it. I have this same pattern and some royal blue and off white boiled wool fabric that this would look good in. I also have some nice cream colored wool/lycra/poly mix that would work, I think i will be hitting you cup on construction tips on this one. I will have to think about if i want an interlining or not, and also the kind of interfacing to use (i’m more of a fusible kind of guy and not sew in) That being said I do use muslin for interfacing in shirt collars, cuffs and plackets since i have had bad bubbling experiences with fusible interfacing in shirts.
I know what you mean, one of my favourite shirts has bubbled at the collar – I keep saying I’ll replace it but can’t quite muster up the energy!
I used fusible on this though, and so far so good!
Good luck with your coat. Let me know if I can help in anyway.
👍🙏
Great coat (and lining) There is a place in Soho called DM Buttons who will do buttonholes. I’ve not used them, but they get great reviews on sewing blogs.
Thank you! I love DM Buttons! I’ve been a few times now! 👍🙏
The lining is so pretty though! A real pop of colour to contrast with the basic black outer. I’m always in awe when I see sewists make outerwear like this!
Thank you! I’m really pleased with how it came together 👍
Great work, looks fantastic!
Thanks!