

Hello Sewists,
I’ve been making lots of shirts lately. Wanting to mix things up a bit, I’ve been making a few adaptations to my regular pattern. This way I can have total control over the finished look, but know that I’ll get the fit I expect from my TNT (tried & true) base pattern.
(If you want a full rundown on putting a shirt together, you’ve got to go all the way back to this post – although I do it slightly differently every time!)
Now, this may or may not turn into a little series, but for the meantime I thought I’d just focus on a few button placket variations. (The shirts are already made, so you’ll be pleased to see that I’ve taken the trouble to sew up little samples to accompany the (sometimes confusing) dialogue that meanders through this blog… )
Personally, I don’t always use interfacing on the button placket. As the fabric is folded over in this area I usually find it stable enough for a casual shirt. If I want a little more structure then I choose an iron on interfacing in a lighter weight than my main fabric – I’ve had varying success with this and have not been diligent enough to note which interfacings adhere better than others… it’s not always related to the price… I will have to keep a closer eye on this from now on.
If you are unsure of the quality of your interfacing either DON’T USE IT!! Or iron it onto the non-front-facing side of the placket. It will still add structure but not be seen from the front in case it bubbles or comes unstuck. I’ve recently tried some lightweight sew-in interfacings, just in cuffs and collars – I’ve been much happier with the results & think I might stick to this (no pun intended) in the future.
Anyway, we can have a long and heated debate about interfacing in the comments if you like. I’ll get on with the plackets now…

- FOLD OVER PLACKET:
This is the simplest technique I’ve used. Especially good if you have a tricky pattern to match as the button extension isn’t sewn on, but cut onto the front pattern piece, then folded over. Left and right sides are treated the same. (Make sure you pattern match to the centre line, not the placket edge).
For a 3cm wide placket:
Measure 7.5cm from centre front (CF) and mark.

The first fold is 1.5cm from CF to the inside.
Fold the raw edges into the crease, press well.

Edgestitch the outer edge.
Stitch the inside fold down from the front, catching the fold underneath.

- SEWN-ON PLACKET:
This is cut separately so is perfect for contrast pieces. I’ve used a plain button placket to break up a busy shirt pattern and vice versa. Cut the right front as above for a plain fold over band. These instructions are for the left front only (right front if you are making a ladies shirt – why is life so confusing?!)
Cut the left front piece at the CF mark.
Cut a contrasting placket using the length you cut off and measuring 9 cm wide.

Sew placket to front (right sides together) at 1.5 cm with edges aligned.

Grade the seams and press towards the placket.

Fold and press placket at 3 cm.
Fold and press the seam allowance on the inside so that it just covers the stitching line.

Stitch from the top to secure the placket inside.

Edgestitch the front edge.
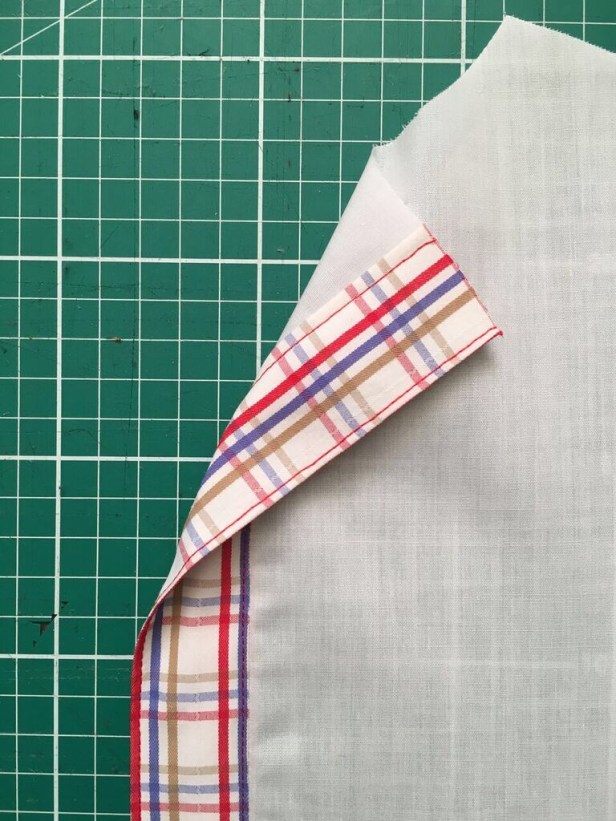
- BIAS PLACKET:
This is the same as a sewn on placket but the band is cut on the bias. It looks great on checked shirts.


- TAPE OR RIBBON PLACKET:
Here’s a technique to add contrast to the under placket. Use a strip of tape or ribbon between 2.5-3 cm wide and long enough to fit the front of your shirt.
Mark 1.5 cm from CF on right front piece. Mark another 1.5 cm for seam allowance.

Sew a strip of ribbon to the back of the right-front on the seam line.


Turn and press to the right side and edgestitch in place.

The raw edges are hidden beneath the tape.

So there it is, for now. With ribbons, tape, patterns & checks, contrast fabrics etc the options seem endless. On my latest one I went bias crazy and cut the yoke, placket, pocket & cuffs all on the bias.


I’ve been waiting to make this shirt for ages. I bought the fabric last October on a trip to the Isle of Wight. There was a little fabric shop in Ventnoor called Rainbow Fabrics which was, sadly, closing down and I picked up this cotton shirting for just £3.50 a metre.

Oh, and what’s that on my chest… a sewist pin?! (… I couldn’t not mention it!!) If you want one of your own head over to my Etsy shop!

Until next time, Happy Sewing!

Notes to self:
- Remember which version you are doing and cut the right sizes.
- Research more variations.
- Keep a note on interfacing: where bought, how much, brand name… performance.
- I’m going to try a hidden placket in the future too…
Good for you! I seem to have missed the last few posts and will try to catch up–
Bless you! I’m still thundering away over here! 👍🙏😄
“Women are always right, men are left over”. Love your shirt plackets.
Haha! Thank you!
Thank you for sharing! I am sure to come back this post and learn more of them.
Thank you 🙏 I hope it’s useful 🤞👍😊
I love love love these shirts! So stylish! I bet you are the best dressed stylist in the salon!
My daughter was a stylist until she passed away, I used to tell the young men Stylists (when she was in school) if they wanted business they needed a great look! LOL! (some did not) I told one very handsome young man he needed to change his name from Mark to Pierre! ;o) And we’d fight over him to do our hair!
I digress, you look amazing. AND you made them! Impeccable sewing!
Haha thank you! Maybe I’ll go by Pierre from now on 😂👍
Nah!
Andrew sounds very professional! ;o)
Makes such a difference when you add a little tweak…and yes ..why oh why do we button up differently? I was led to believe it dates back to when men had a dresser and therefore someone to do their buttons up. Us ladies of course, didn’t wear shirts back then🤣
So many weird ‘rules’ 😂🤗