
Hello! I don’t know about you, but after I’d been sewing a couple of years I gained a bit of confidence, like I was a solid beginner. By three years or so something twigged and I dared to think I could be ‘intermediate’. Now, here I am, pushing four years of ‘haphazard-homeschool-sewing’ and feeling pretty pleased with myself. I mean, I can knock up a shirt, do a decent welt pocket and zip flys… I’ve picked up some skills, if I can say that without bragging. And then, suddenly, it all comes tumbling down … with one little girls dress!
Now, before I go on, let me just say… it’s been said many times of creative pursuits that they are a continual journey of learning – I believe that’s as it should be. I don’t think we should judge ourselves and categorise ourselves as beginner/ intermediate etc as these labels are less important than enthusiasm and a willingness to learn and improve. And all of that is less important than the ability to take joy from your crafting. So when I say my confidence was knocked, what I really mean is my ego was knocked!
With that said, I had a pretty steep learning curve on this innocent looking little dress!

I’ve made a few things for my many nieces before, simple frocks with lapped zips, mostly lined bodices so not much binding. That sort of thing. This dress was a step up from that!
I had this fabric from the same car boot sale haul as these shorts and these more recent ones. It was crying out to be a pretty frock. Rather than reuse one of my existing patterns I looked for another one with a few more interesting details. In the end I settled on an old Burda magazine, issue 4/2016. Girls dress pattern 134.
It had a Peter Pan collar, bias bound arm holes and knife-pleats! Although it’s a shirt-dress, even the button placket is different to what I’m used to as it has a folded facing instead of my more recognisable band.
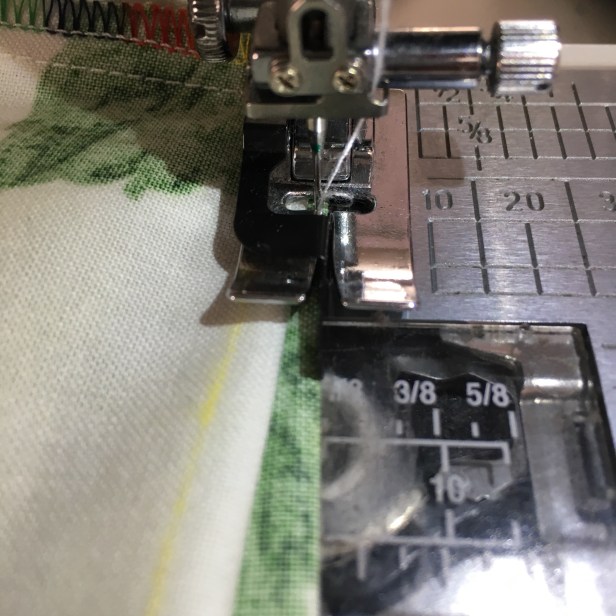
Shoulder seams first then the collar went in. It was fiddly because it’s small, but the technique is the same as a pyjama collar ( … you sew the collar on with a piece of binding on top, that flips over to cover the raw seams. The binding edges are later covered by the ends of the facing.)
I wanted to sew it down at this point, but I waited. (The pic below is further ahead than the story…!)

I’ve not done much bias binding. Or at least, I’ve not had much success with the bias binding I have done in the past… it doesn’t come up much in sewing menswear. After doing one armhole then unpicking it, I practiced on a mock up scrap and developed a method. It’s not foolproof but it kept me tidy for now:
I had a ready made cotton binding which I ironed flat then folded in half and ironed again.
- First I overlocked 1cm of my 1.5cm seam allowance off.
- Then I pinned the binding to the edge with the folded edge away from the seam.
- Sew it at 5mm then press the seams and the binding away from the bodice.
- Fold the bias completely to the inside and press/ pin in place.
- Sew from the right side at an even distance from the edge, catching the bias tape underneath.

I had to use a narrow overlock and it did peek out a little bit at times, but until I can practice a cleaner method, this seemed to work. I was very diligent and where I missed the binding, I went back, unpicked and restitched: in the long run, this was much easier than trying to fudge it with messy hand-stitching later on (& was another lesson learnt!)

I’ve done a couple of pleats in bags and pockets but nothing like this before. I was grateful for the easy workability of this quality cotton while I marked and pressed the pleats. Being for a 6 year old child probably made this a bit (… a lot!) easier as the panels weren’t too big. They fit on the ironing board easily enough.
I marked the pleats with chalk lines and folded and pressed them in place. I used pins to hold them while I pinned the panels to the front and back bodice. I should explain here that I’m totally winging it with no instructions, having given up long ago on Burdas sparse descriptions. It was here that I realised the pleats on the back were going in the wrong direction. I couldn’t tell the correct way from the diagram and the arrows on the pattern seemed inconclusive, but I thought they should point out, not in. Thankfully, their placement meant that I could get away with flipping the ‘blades’ over – and giving them a good starch to reset them – without ruining the balance.

With the skirts attached to the bodices and the side seams sewn, everything overlocked and pressed, I felt I was getting to the end… Not so fast!
As I was swishing it about I noticed that the pleats kept getting un-pleated. I thought there must be a method for stitching the pleats in… I did a quick google search, but couldn’t find what I was looking for. So this is what I did, and you can tell me if I guessed it right or if there’s a better way…!
I used my edgestitch foot to sew along the inside fold of the pleat, where it wouldn’t be seen. This would, of course, have been easier to do before attaching the bodice pieces, but I hadn’t thought of it by then. It was easy enough to fold everything out of the way and get a good run up to the ‘knife-edge’!
I could tell from the first one that they would hang much better and hold their shape longer… so I went in and did the lot.
After, I folded the bottom ends of the facing over and sewed them in place, double turning the hem before turning the corner through. Then folded and pressed the entire hem. With it all in place I could now sew round the whole thing… I double checked my bobbin and was good to go… I started behind the collar, catching the binding then the facing underneath. Down the front, all along the hem, up the other side and back around to meet where I started.

I was pleased to use my button gauge again for the buttonhole placement. Three above, three below.

And as it was only two layers of fabric with no lumpy bits, my button holes came out marvellously. I used iron-away pen to mark the button placement…

I always put my buttons on at the machine. I set the stitch length to zero and the width is usually the default, although I hand wind to start if I’m not sure.
I make my marks long enough to see behind the button, then, with the button on a piece of clear tape I can position the centre over the cross.

I’ve got a lockstitch on my machine which ties the threads for you at the back. It mostly does this with a bit of a thread-bunch – and hand tying the ends would be a much prettier option. If you’re careful removing the tape you can use the same bit for all the buttons.

I’ve been given two button tins in my time so far. One is a lovely big box full of all sorts of hand curated buttons, all hand sewn onto colourful cards. I was given it by some clients a couple of Christmas’ ago and it appears to be bottomless so far! But these buttons came out of a tin given to me by a wonderful lady called Ivy who, with her husband Charlie, used to live next door. They were super old but fantastically resilient and I always admired them living in the West End of London in their 80’s & 90’s … MrA & I used to help them out from time to time whenever they invariably got themselves in a pickle.
They moved to the seaside over a decade ago before passing peacefully away. When they left, Ivy gave me her button tin. I hadn’t started sewing at the time, but she must have known it was in me and I’ve treasured it ever since. It is more special to me now, that I can actually use it, and I was thrilled to find six perfect matching green buttons.
And here it is all finished… of course with #rainbowseams on the inside…

The back…

Those pleats…

And of course, the front…

Obviously I was going to be a pretty bad uncle if I didn’t make one for her sister too. So I put into practice what I’d learnt and made another.
Her sister is older, age 8 but tall, so I took a guess and added 2cm to the bodice and the hem when I traced out the new size. Before I started again, I checked the instructions thoroughly. I also read about binding armholes in another sewing magazine to help clarify. Here’s what I learnt/ did differently…
- When I traced the arm hole I only added 1cm seam allowance.
- I checked the instructions and made my own 4cm wide bias strips.
- I sewed the arm bias on at 1cm, trimmed seams to 5mm, pressed upwards and edgestitched then sewed the side seams before turning the binding in and topstitching it (some things are much easier when you do them properly!)
- I only sewed the neckline underneath the collar. I sewed the hem separately – not sewing down the fronts this time.
- I didn’t stitch the back of the pleats.
- I added ‘beltloops’ for a ribbon tie.
And I’ve got to say, it came out all the better for it. My bias binding is slowly improving…

It’s another ‘stash fabric’ – I thought I’d used all of this up already, but found a good couple of metres folded away under the bed! (… one day, I might do away with the bed altogether and just sleep on a pile of fabric!) The buttons came from Ivy’s tin again.

Of course, the insides are featuring #rainbowseams!

And here it is full length…

It was really refreshing to make these dresses- something totally different from my usual sewing, with new techniques and challenges. Because I was making them for someone else (and not in a hurry) meant I could enjoy being more careful, slow down a bit, unpick & re sew wobbly bits, and even practise new techniques on off cuts! Also very satisfying to use up a couple of nice pieces of fabric from the stash under the bed!
By the time you’re reading this the first dress is already with its recipient and has gone down very well indeed! The second one will be posted down soon and I hope it is received as well as the first!
Phew! ‘Best Uncle’ status is reaffirmed!
Happy Sewing!
Notes to self:
- There are so many more techniques to learn and practise!
- Next time I’m in the mood to ‘push myself’, I might look for a pattern with more in depth instructions!
- Making different types of garment is more fun and more challenging than making the same ones again and again (although I wouldn’t say no to a few new summer shirts…!)
- #sewyourstash – both fabric and buttons. They were two beautiful elements crying out to be made into something worthwhile!
- #sustainablesewing – making for others to continue to enjoy sewing without over filling my own wardrobe.
- When I posted the 1st dress on Instagram, someone informed me that they had found the fabric for sale online priced at Australian $168 a metre!!! I think I paid British £8 at the boot-sale! (The 2nd fabric was a gift and I’m afraid I have no idea where it’s from.)
Armhole binding in a nutshell… just to be sure…
- Stitch and finish the shoulder seams. Press to the back.
- Finish the side seam edges.
- Sew the binding to the armhole and trim the seam allowance.
- Press the binding over the seam allowance and ‘understitch’ them together, close to the seam.
- Sew the side seams together and press the seams open.
- Fold the binding to the inside so it is not visible from the front.
- Sew it in place from the front at an even distance from the edge, catching the binding underneath.
You definitely have lived up to your best uncle status with these two gorgeous dresses! Thank you for all the details on your problem solving, I found them most interesting. Bravo!
Thank you! I’m glad I’m explains things, not confusing things! 😅👍🙏🤞
I think you have a new career! ;o) Absolutely beautiful!
I sew the bodice side seams before I add my bias around the arm holes. Less friction. :o)
Aah yes, then do the overlap thing…! I’ll try that next time thank you 👍😊🙏🤞
Those are both darling. Good for you for trying something new and sticking with it enough to actually learn and improve your skills. Great job!
Thank you! I feel like I should sew a mile if binding now, just to prove to myself I’ve got it! 😅🙏🤞👍
Make it amusing and then have it show up somewhere fun–I’ll look forward to it!
And then make some outrageous project that cleverly features it–for the video, of course.
Haha! Yes! 😎
Best Uncle status indeed! Both of these dresses are so pretty!
Thank you! I’ll be visiting them in a couple of weeks 👍🙏🤞
Two super cute little dresses 😀 And two super lucky little nieces to have a clever uncle to make them pretty things. When my boys were small all I could ever find were girls patterns but I never had girls to make for 🙁
Don’t recall ever doing knife pleats but I do remember wearing long ‘kilt’ style skirts to school … eveyr Sunday I would sit and pin each pleat in place meticulously then steam the living hell out of each skirt so they looked like new :’D Certain they were never stitched into place back then. But then again they were mass produced shop bought skirts, maybe a home sewer would have stitched them all down out of sight … research required I think … Maybe there is a different technique to the ironing that sets the pleats in place like StayPress creases in mens trousers? mmmm
6 days to that deadline btw 😉
Lainey x
I’m visualising You with an iron over the fire!! 🤣😂🤣 but I know we’re not THAT old!!! Hats off to your dedication to those pleats though!
I’d like to make some stuff for the nephews too… but they’re either really tall or really discerning!! 🤭😂🤞👍🙏
You definitely deserve Best Uncle status! These are both so lovely and Ivy’s buttons are the perfect finishing touch!
Thank you 🙏 … I hope the little one doesn’t get scratched under the armpits… otherwise I’m hoping for a win! 😬😅👍🙏
Another inspirational post. I sincerely hope that you consider entering the GBSB. Closing date very soon. I’d love to follow you and Fiona on there. Seriously ….
Aww thank you for your encouragement 🙏 you never know… a few too many beers & I might fill the form out! 🤭🤪🤣
These dresses are divine. Fit for princesses! You should look into getting some of the bias making gizmos that are made by Clover. A strip of fabric goes in one end, and perfectly folded trim comes out the other. You’ll want to add bias trim to everything!!!
Thank you! I can’t wait to see the girls in them.
I tried bias makers unsuccessfully a couple of years ago & was too impatient to nail it … I’ll have to dust them off and try again! 👍🙏
These are FANTASTIC! It’s always difficult when we make something we’re not used to, but you’ve done a brilliant job. I use bias binding on the hem and sleeve edges of the short sleeve shirts I make for the husband – I love using contrasting colours!
Can’t believe you found such luxurious fabric for such a bargain price either! What a find!
The buttons on the white dress are absolutely beautiful…. I do love a good button tin and it’s so lovely that you had one gifted to you ☺️
Thank you 🙏 it’s funny how some techniques just haven’t cropped up for me much! I’ll try that on the hems… I’ve been shortening the curve to get a cleaner fold 🤫🤭!
I can’t wait to see the girls in them 🤗👍