
This is a pattern from FREESEWING (nee: makemypattern) the free online pattern generator (… and much more besides…) created by the incredibly talented Joost DeCock. It’s a marvellous website where you can upload a set of measurements, select a pattern and print it out in your size, in minutes.

… did I mention it’s also free!? (You can donate to contribute to the sites running costs, really easily by PayPal too.)
Logging in/ signing up is really easy and as a first timer you are guided through the simple steps to get started. I am in awe of what Joost has created and only wish I used it more. I had great success with MrA’s trousers a while ago (Until he bought some jeans with about 30% stretch in them from America, he’s maintained that they are his most comfortable trousers.) But I suppose the recent TNT topic from the Sewcialists comes part way to explaining why I’ve used the site so little…
All the plus-sides of using a tried and true pattern are obvious; you know it fits, how to make it etc… but the big downer is that it can stop you (…me!) from trying out new patterns. Although one dress pattern can be very different from another dress pattern, the same cannot really be said for trousers or shirts – with a few simple to learn alterations most men’s variations can be made from a TNT pattern. Couple this with the fact that my home printer is now nothing more than a plastic lump, gathering dust, and it’s pretty easy to see why I keep reaching for that Japanese pattern book!
… But not this time! I had a spare moment at work to get online and print out the Huey Hoodie. I would have made the Hugo Hoodie (there’s a great sewalong video series for it on YouTube) but if I have a hood, I also like a front opening. I don’t know why, I just do.
I’d made the hoodie from Men’s Clothes For All Seasons* before, out of a vibrant palm tree fleece blanket. Surprisingly, it gets quite a lot of wear; chilly evenings on a tropical holiday and chilly evenings in London’s cold winters. Sadly the first opportunity occurs less often!
Instead of making alterations to the MCFAS* pattern I decided to try Freesewing’s made to measure option.
The Huey Hoodie is still in its ‘beta version’ which I understand to mean ‘it’s not quite ready, but why not have a go…’ there are no instructions yet, but I’m getting used to that after losing them on my last two makes (Peacoat & Dog Coat!)
I suppose the one downside to Freesewing is that it’s so clever, ie. maybe a bit too clever for me… do you ever get that thing where the more you concentrate, the less you understand…? Anyway, I confused myself regarding the amount of ease given, so I slimmed the pattern down a bit when I should have realised that the default ease is the recommended amount, not extra to the recommended amount… it’s a bit of a happy accident in the end as I love the slim shape & it fits well under coats and jackets just as I hoped it would. But if you’re not sure about tweaking the options, take my advice and leave them alone!
For some reason the pattern printed quite long in the body, this is probably due to my initial measurements or maybe I just prefer my hoodies shorter, but was easily spotted and altered. I took 5cm off the length, then another 5 cm for the band.
The cuffs and hem band are not included in the pattern, which isn’t a major issue, and I suppose the sizes vary depending on how much stretch your ribbing has anyway. I’ve heard whispers that a formula exists to work out ribbing lengths based on equations and fractions and stretch percentage (… oh my!) but maybe it’s an urban legend…? In the end I made the cuffs 2cm smaller than the opening and the hem 4cm smaller. I checked that these measurements would also be comfortable around my wrists and hip.
So to put it together…
I made the hood first, lined in a fleecy felt. I stitched the seams down and once it was turned through I edgestitched/ topstitched to give it a clean front edge. I also stitched-in-the-ditch along the centre seam to hold the two pieces together.

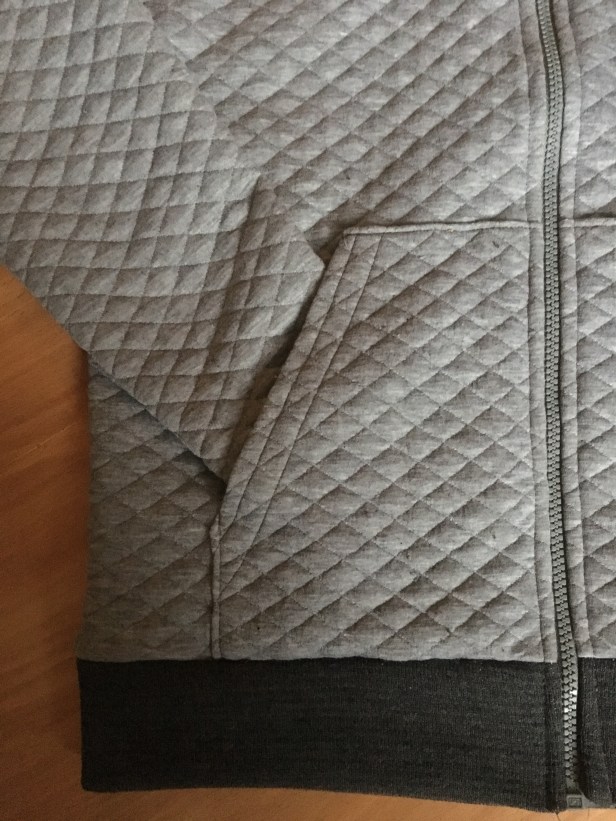
Then I put the pockets on. I used basting glue to hold the seams flat and secure for stitching. I made 2 x 1cm folds at the opening and double stitched. Then glued down the top and side seams, glued the pockets in place, edgestitched the folded seams and basted the raw edges.
Next I joined the shoulders, pressed the seams open and glued staytape across the seam. This way I could topstitch from the front with no pins and still catch the tape underneath. Nice and even.

I put the sleeves in flat, pressed the seams open and stitched both sides.

Then I sewed up the sides and sleeves. I stitched the seams down again which was a little tricky up the sleeve-hole, but I took it slow and made it without any serious mishaps.
I went for the cuffs and waistband next. I basted them first with a short zigzag then went round a couple of times with the overlocker. (Once with the blade, once without, for good measure).


I put the hood on next, then the zip (which I actually basted to get a good line-up on the pockets! This was also the only time I took the walking foot off… maybe someone should invent a walking-zipper-foot…?)


But this is where I got into a bit of a pickle. I hadn’t factored the depth of the hood at the front in my zip calculations, so the zip wasn’t going to reach right to the top. I didn’t have a long enough zip anyway, but if I’d have realised earlier I would have just curved the corners of the hood opening. As it was I came up with this little poppered-flap, which I absolutely love.

I’d decided against using the facing. I’m never sure if a facing like this should be sewn down, and if you don’t, I find it flaps and gets in the way. So, I used a bit of tape as binding for the neck seam. In the picture below you’ll see why I keep hand sewing to a minimum…
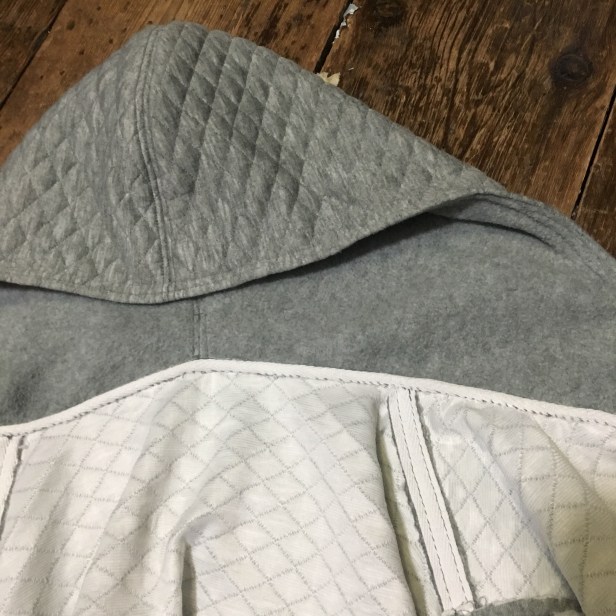
And with that, it’s done! To be honest, it’s taken a lot longer to blog about than it took to make! The fit is great. I’m really happy with it. The shoulders sit well and the hood is perfect. I bought this quilted jersey at GBSBLive earlier this year, but can’t for the life of me remember which stall. I’d been saving it to make my ‘favourite hoodie’ and now I have it!


I had some great news recently that I won the Menswear category of the Simplicity Sewing Challenge, with this shirt. As well as some trims and pins, I got to choose 12 patterns from their website…

… all men’s patterns apart from the cape which I thought could be unisex. As you can see, I’m not really going to want for many new patterns in the future unless I make a new rule. Well more of a guideline…
As much as I love the security of a TNT pattern, I shall endeavour to remain flexible in my pattern choices.
There, surely that’s an ambiguous enough statement to keep me on track without holding me back!
Happy sewing!
Notes to self;
- Even though it would have been a bit long, it’s a win for Freesewing on the fit.
- I might print it again without adjusting the ease.
- I will definitely use Freesewing if I’m making something as a gift for somebody, how great to know it’ll fit well (especially if it’s a surprise gift!)
- Now I must try and collect as many sets of measurements of my friends as possible!
- Find more fantastic jersey like this!
oh this is lovely! congrats on winning the Simplicity challenge, you were one of my favorites last year for your vintage make too.
This is a lovely hoodie, I would definitely like to make one too for my Mr. A (Yes, I call my hubby that too). Thanks for the recommendation, I have already joined freesewing.org.
Congrats on your Simplicity win. I made a shirt from that 1327 pattern once – probably still have it …. somewhere.
Thank you 😊
Wow, what a nice job. It looks… well, sewed in a garment factory. The top stitching is terrific. Choosing to use the tape really put a garment factory touch to it. (i hate facings 2, and look at ready to wear to see how i can improve on my clothing.) It is so nicely done, makes me want to make one for myself. Great job, Merry Christmas.
Thank you! I can’t wait to find the right jersey and make another! Merry Christmas to you too 😊🎄
Damn I love this fabric so much! This really came out great. Would it be ok if I showcase this make on the site with a picture and link it back to this blog post?
Yes, of course! Thank you 👍👏😊🙏
Here we go: https://freesewing.org/showcase/quilted-jersey-huey/
I’ve also assigned the showcase and ambassador badges to your profile. Thank you for time and effort in this.
Cool, my pleasure!
Bravo – great hoodie! Your outerwear wardrobe must be nearly complete. I haven’t subscribed for long, but I think you’re only missing a raincoat and tails!
Haha! Yes, I think you’re right 😅😂 … I did get a Napoleon costume pattern recently too!
Good job! Fabrics Galore have a light grey quilted jersey on their site, perhaps you got it from them?
Thank you! Yes, it was them, I got a couple of great fabrics from them!
You know when you just pull a blank..?! … phew, I can sleep now! Thank you! 👍😅😊🙏